
Assigning Tags to Line Items
Learn how to assign one or more tags to specific line items within a template or document to keep your data organized and searchable.
Prerequisites:
- Only Admins and Managers can create new tags, while Admins, Managers, and Project Managers can assign existing ones.
Steps to Assign Tags
- Go to the Template or Document where you want to assign tags to its line items.
- Select the line item where you want to assign tags.
- Clicking the line item will display the action menu for that specific item.
- If the action menu is expanded:
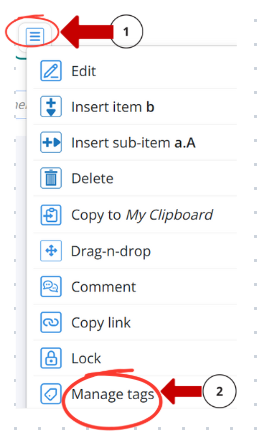
1. Click the three-line menu icon (1) next to the line item — as shown in the image above.
2. From the dropdown menu, select Manage tags (2) as shown in the image above. - If the action menu is collapsed:

1. Click the line item to open the quick action bar, as shown in the image above.
2. From the bar, click the Manage tags icon to open the tag management panel as shown in the image above.
- If the action menu is expanded:
- After selecting Manage tags, a list of available tags will appear.
- Select one or more tags to add or deselect tags to remove any that were previously assigned.
- If you need a new tag, click Create new tags at the bottom of the list, enter a name, select a color, and click Save.
- For more details, see the Manage Tags.
- Click Save — the selected tags will be applied to the line item.
💡 Tip:
Use short and descriptive tag names to make it easier for your team to filter and organize items.
BP-025