
Form preview page
The Form Preview page allows you to view details about existing forms, modify them, or create a new form.
This page is accessible only to managers and administrators.
You can access this page by clicking on existing forms or adding a new form from the Forms page.
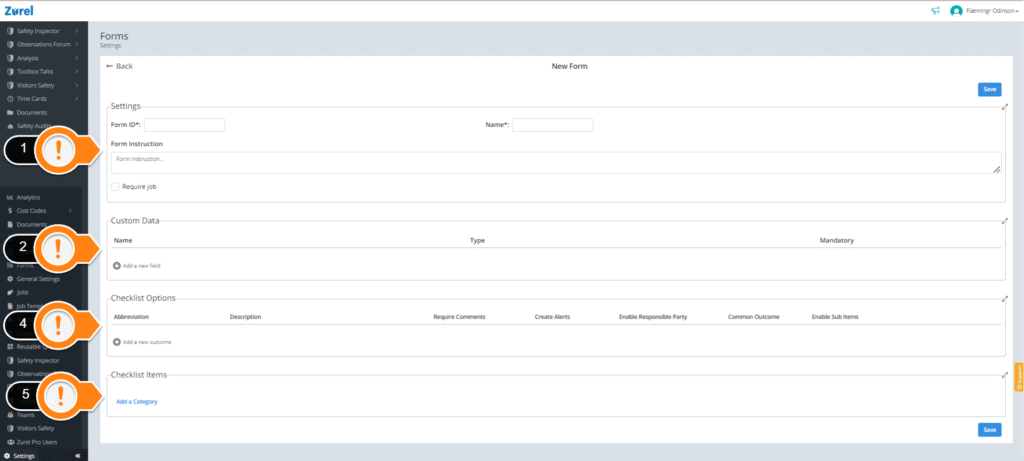
This page has the following items (As labeled above):
1. Settings
This item contains all the basic details about the form, such as:
- Form ID
The number that identifies the form. - Name
The name of the form. - Form Instruction
The instructions that the form creator has added to the form for users. - Require Job
The checkbox, when enabled, lets you make adding a job mandatory for the form filler.
2. Custom Data
This item allows the form creator to add custom data to their forms according to their unique requirements. The user can click “Add a new field” to create custom data. This item has the following fields:
- Name
The name of the data. - Type
The type of data. Data can be of the following types: - Number
Any real number. - Text
Any form of text. - Yes/No
Either yes or no. - Single Select
Option to select one answer out of many. - Multiple Select
Option to select many answers out of the given answers. - Mandatory
The checkbox, when enabled, allows you to make custom data mandatory on your forms.
3. Checklist Options
This item lets you create options for your checklist. Clicking on Add a new outcome here enables you to create a color-coded outcome. This makes it easier for your users to decide the outcome of individual items of an analysis or inspection. The Checklist Options item has the following fields:
- Abbreviation
The short form of your outcomes. This lets your users identify outcomes easily with their corresponding colors. - Description
The full name and description of the outcome. This lets your users understand when to use the outcomes and gives the full name of the outcome. - Require Comments
The checkbox, when enabled, lets you make comments mandatory for the user who chose this outcome. - Create Alerts
The checkbox, when enabled, lets you create alerts when a user chooses an outcome. - Enable the Responsible Party
The checkbox, when enabled, lets you make adding the name of the responsible organization mandatory when a user chooses an outcome. - Common Outcome
The checkbox, when enabled, lets you make an outcome a common outcome. A common outcome can be used to mark all the unselected outcomes in a form in bulk. - Enable-sub Items
The checkbox, when enabled, lets you make sub-items of an item visible when the outcome is selected. When an item has no value type, sub-items for this item are auto-displayed.
4. Checklist Items
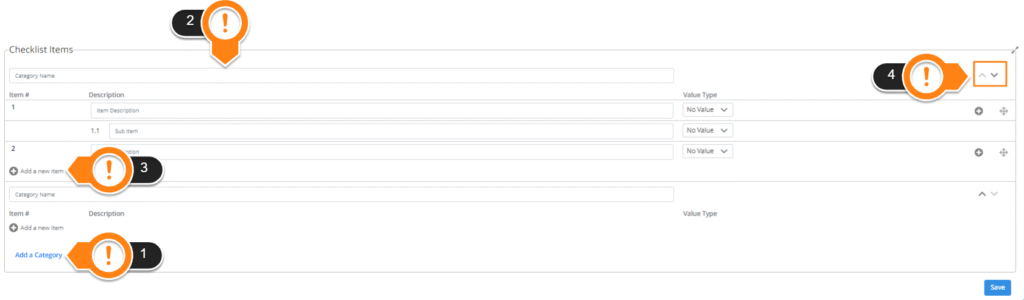
This item lets you create categories and lists of items and sub-items that may be required for your forms. It has the following fields:
1. Add a Category
This button lets you add a category.
2. Category Name
This field has the name of the category.
3. Add a new item
This button lets you add a new item to your category.
4. Ordering Arrows
These arrows let you decide the order of the categories. The categories will be displayed in your form according to this exact order.
You can delete a category by hovering over the category name and clicking on the bin icon that appears.
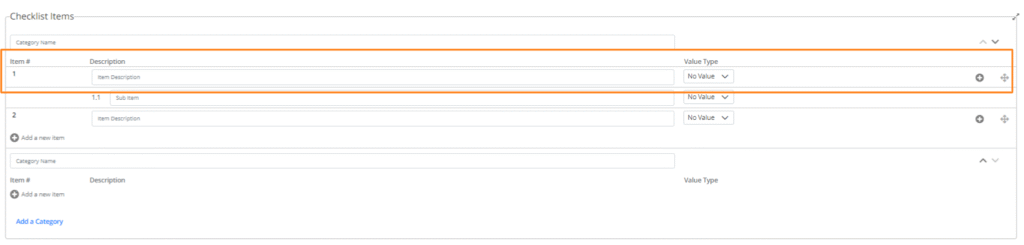
When items are created in a category, you can see the following (As labeled above):
- Item #
The number that identifies the item. - Description
Full name and description of the item. - Value Type
The value type of the item. An item can have the following values: - No Value
The item has no value set. - Short Text
The item can only be described with a short text in the form. - Long Text
The item can only be described with a long text in the form. - Number
The value of the item can only be a number. - Yes/No
The value of the item can only be yes or no. - Checklist Options
The value of the item can only be one of the checklist options set by you. - +(Add) Button
The button lets you add a sub-item when clicked. Sub-items have the same value types as an item.
You can click and drag the items to change item order. Items are displayed in the form in the exact order you set them. Hover over an item to delete or edit it.