
Safety Observations Roles Settings Guide
Safety Forum-Roles page allows you to assign various roles to Zurel Pro users.
This page can only be accessed by Zurel Account Admin and Observation Admin users.
You can navigate to this page from the Zurel web app root menu by selecting Settings > Safety Observer > Settings > Roles. When opened, the Roles page looks like the attachment below:
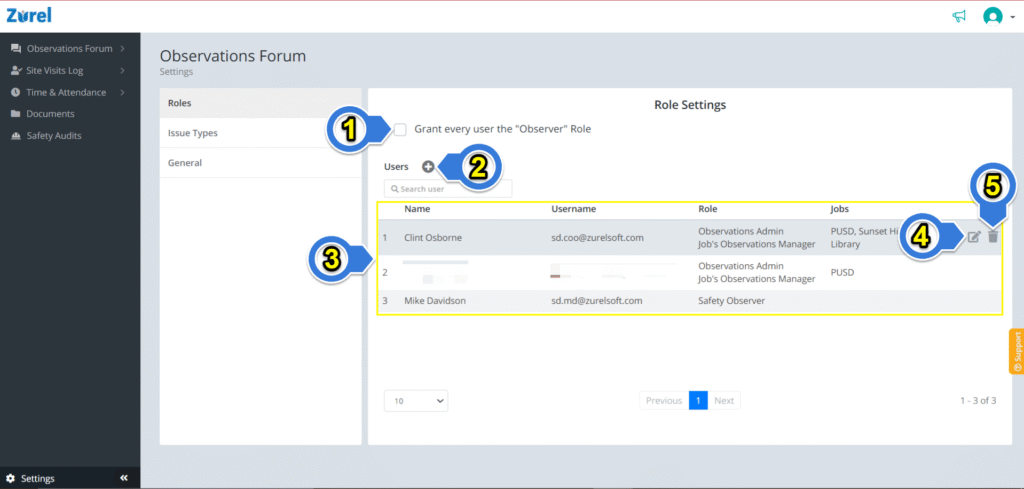
This page has the following elements (as labeled in the above image):
- Grant every user the “Observer” role
Selecting this checkbox grants all Zurel users the Observer role. If you want to assign all Zurel users of your organization the Observer role, tick this checkbox. - + (Add)
Besides granting Zurel users in your organization the role of an Observer, you can also assign roles to your Zurel users individually with the “+” button beside Users. Click this button if you want to add users and grant roles to them individually. Selecting this button launches the Add a User Role window. - Roles Table
Each Zurel user who has individually been given access to the Observation Forum is listed in the Roles Table. The list consists of the following columns:- Name:
The first and last names of the user. - Username:
The Zurel user’s email address. - Role:
The role of a Zurel user according to the role hierarchy. The roles may either be generic or specific. The roles you can assign to a user are:- Observations Admin
- Observations Manager
- Job’s Observations Manager
- Safety Observer
The privileges and features of each role are listed at the end of this page.
- Jobs:
If a user is assigned the Job Observation Manager role for one or more jobs, those jobs are listed here. In cases where a user has multiple jobs, the jobs are separated by a comma. If the Jobs column is left empty, the default “All Jobs” option is assigned to the user. In addition to being assigned other roles, the Zurel user may also be assigned Job’s Observation Manager for a specific job.
- Name:
- Edit Icon
When you hover your mouse over any row in the Roles Table, an Edit icon appears on the immediate right of the Jobs column. Clicking on this icon lets you edit user roles and jobs. - Delete Icon:
The Delete Icon, which looks like a trash bin, appears alongside the Edit Icon when you hover over a row in the Roles Table. Clicking on this icon lets you delete a user role. Clicking on the trash bin icon opens the Delete User window.
Add a User Role
The Add a User Role window allows you to add a new user and assign roles and jobs to them.
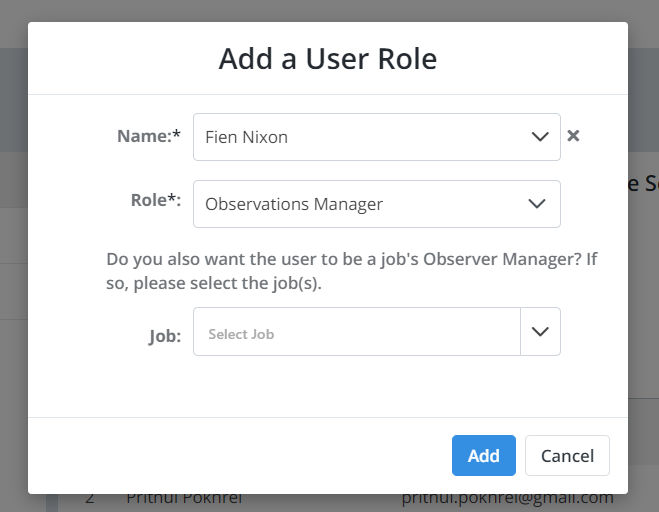
This pop-up appears when you click the “+” icon (element 2 of the Roles page). It has the following elements:
- Role
This dropdown lets you select a role for the selected user. - Name
This dropdown lets you select the user you want from all the active Zurel users. You may click on the down arrow to see the list of active users. You could also type the first name or the last name of the user to find and select the user. - Job
This item appears and is mandatory if you have selected Job’s Observation Manager for the user’s role. The Job dropdown lets you assign jobs to the selected user from the available active jobs. A user can be assigned more than one job. To see all the active jobs you can assign to a user, you may click the down arrow. You could also type the name of the job to find and select it.
The Job item appears even in cases where you haven’t selected Job’s Observation Manager. Unlike in scenarios where you have to, filling this item isn’t mandatory. This item allows you to grant the user a job-specific role in addition to the general role that has been granted.
Delete Role
The Delete Role window lets you delete users from the Roles Table.
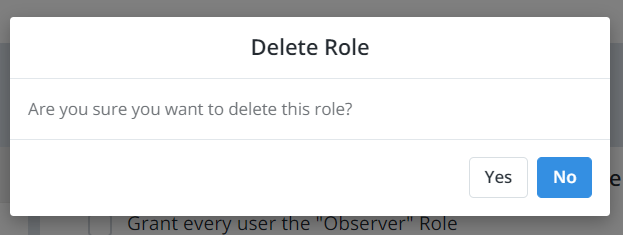
This dialogue box appears when you click on the trash bin icon (element 5 mentioned above) that appears when you hover over a row in the Roles Table. You may click on Yes to delete a user and No to reconsider your decision.
Role’s Privileges
The table below explains the privileges users with each role have:
| Observer | Job’s Manager | Manager | Admin |
|---|---|---|---|
| Manage Role | |||
| Manage Issue Types | Manage Issue Types | ||
| Manage General Settings | Manage General Settings | ||
| Access Observations Dashboard in Desktop (Only from their job’s observation) | Access the Observations Dashboard in Desktop | Access the Observations Dashboard in the Desktop | |
| Access the My Observations dashboard in the mobile App | Access My Crew’s observations dashboard in the mobile App (Only from their job’s observation) | Access My Crew’s observations dashboard in the mobile App | |
| Access all shared observations in the mobile App | Access all shared observations in the mobile App | Access all shared observations in the mobile App | Access My Crew’s observations dashboard in the mobile App |
| Access the Observations Dashboard on the Desktop | Access the My Observations dashboard in the mobile App | Access the My Observations dashboard in the mobile App | Access all shared observations in the mobile App |
| User Privilege | Admin | Manager | Jobs Manager | Observer |
|---|---|---|---|---|
| Access Shared Observation | YES | YES | YES | YES |
| Access My Observation | YES | YES | YES | YES |
| Crew’s Observations | YES | YES | From the assigned jobs | |
| Mobile Notifications* | From the assigned jobs. | |||
The delivery of mobile notifications is dependent on services provided by 3rd parties and is not guaranteed to be timely. For issues that require immediate attention, please have your crew notify using other mediums, such as a phone call.