
Tracking and Reverting Line Item Change History
This guide explains how to track changes made to a line item over time and restore its content to a previous version directly within the document.
Steps
- Go to Projects and select the project you want to review.
- Open the document that contains the line item whose content history you want to track and revert.
- Review the line items in the document.

- If a line item has been edited before, you will see a history icon next to it, just like the image above.
- Click the menu action for the specific line item you want to review.
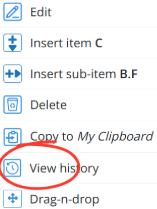
- Select View History as shown in the image above.
- The Content History modal screen opens, displaying all the contents from previous versions of the line item in chronological order, with each entry representing a change made over time.
This includes:- The latest version of the line item.
- The original version before changes were made.
- All the changes made to that line item.
- Click the expand (dropdown) arrow on the version you want to review in detail and restore it to the line item.
- After expanding the content, click Revert to this button.
- Click Save to apply the reverted content back to the document.
💡 Tip:
- Use line item history to quickly compare changes and recover original content without manually re-entering text.
- Reverting a line item replaces the current content with the selected version, so be sure you are restoring the correct entry before saving.
BP-042